How to Speed Up Mozilla Firefox ?

Monday, June 21, 2010

SlowFirefox-Itis. n. The thing that happens to Firefox over time. Symptoms include decline in speed and efficiency.

So, you’ve turned on your computer, clicked on Mozilla Firefox, and then….you waited. “Why,” you say, “Is firefox slower now?”

Well, we’re here to fix that problem! Whether it’s just because you want to make Firefox faster than it already is (which is wickedly fast anyway), or because you want to fix your declining speed, you’ve come to the right place.

Please note that if you do not have firefox as your default browser, I advise you to get it immediately. It is faster and more efficient than every browser out there. It is obtainable at mozilla.org/firefox.

If you use all the methods put together, you should be able to see a speed increase of at least 50% on Firefox.

Method 1:

Okay, well. To begin with, I will tell you how to increase your bandwidth speed by 20%.

Windows actually reserves 20% of your bandwidth for purposes I will never know. I’ll show you in a few easy steps, how to reclaim it.

Step 1:

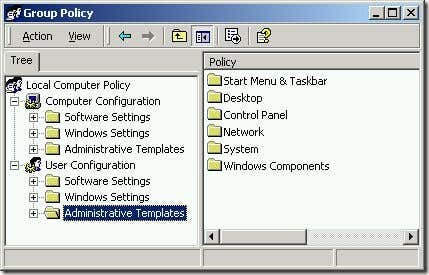
Click “Start“, and go on “Run“, and type in “gpedit.msc“. You should see this:


Step 2: You should see a thing called ‘Group Policy’ open.

Step 3: Double-Click on “Computer Configuration”.

Step 4: Double-Click on “Administrative Templates”

Step 5: Double-Click on “Network”

Step 6: Double-Click on “QOS Packet Scheduler”

Step 7: Double-Click on “Limit Reservable Bandwidth”

Step 8: Check the box that says ‘Enabled’ and change Bandwidth Limit (%) to 0.

You got 20% increase on your bandwidth speed! Easy, was it not?

Method 2:

The next way is to modify the amount of requests can accept at once. By changing it to a very high number (30+), you should see a massive rise in speed.

So, to this, I’ll put it in a few easy to follow steps.

Step 1: Load up Mozilla Firefox. Now, in the address bar, type “about:config” (Without the ” ” of course). You should see this:
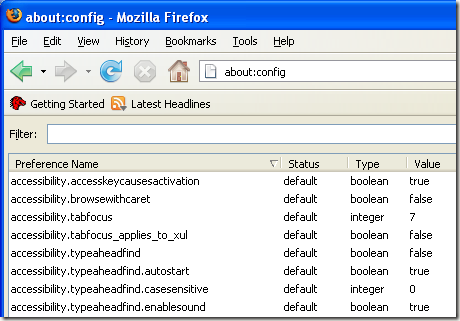
Step 2: Scroll down the page until you find browser.tabs.showSingleWindowModePrefs, and then double-click it. This will set it to “True”.

Step 3: Next, scroll down look for the line that says network.http.pipelining, and double-click this. This will set this to “True”.

Step 4: Now, scroll down and look for network.http.pipelining.maxrequests. Once you have done this, double-click it, and a box will pop up. Change the number to 60.

Close Firefox. You will now experience a 10% to 40% increase in speed.

source:-http://www.online-tech-tips.com/computer-tips/speed-up-mozilla-firefox/

Uninstall Nero 9 trial version

Wednesday, June 9, 2010
Download Nero General CleanTool and remove the conflicting Nero entries which creates problem in uninstalling Nero 9 from your Windows 7 PC.

How to uninstall Nero trial 9 completely from your Windows 7 PC ?

Nero 9 sometimes creates problem in uninstalling completely from your Windows 7 PC. Follow the steps to completely uninstall it from your PC.


Begin with downloading the Nero General CleanTool by clicking on this link :
http://www.nero.com/redir.php?id=4558. After clicking on this link it will automatically start downloading and will prompt you choose the location to save it. Save it on your Desktop.Now unzip the downloaded ZIP files using WINZIP or WinRAR and save it to your preferred location on your hard drive.Double Click the unzipped “exe” file.Nero General CleanTool window will open, listing the installed Nero products.Click on the checkboxes next to Nero products installed, to completely remove them from your PC.Click the Clean Button, a status windows will open with a progress bar indicating the uninstallation progress.Click on the Exit button as soon as the uninstallation procedure has completed.Reboot your computer for the changes to take effect.

Uninstall nero 9 in windows 7

Install Nero 9 on your Windows 7 PC for improved performance of editing, sharing, copying, ripping and burning files.Enjoy faster burn, rip, share, edit and copy functions on your Windows 7 PCs with Nero.

Are Nero products compatible with Windows 7? What Nero products are compatible with Windows 7?

Uninstall nero 9 trial

Yes, Nero products are compatible with Windows 7 operating system. Nero has worked closely with Microsoft for ensuring that the full range of Nero products is compatible with Windows 7.The products which are compatible on Windows 7 Operating system includes. Nero 9 integrated digital media and home entertainment suite.Nero liquidTV.Nero Move it.Nero Back Itup and Burn.

Following are some minimum system requirements that are needed before installing Nero 9 on Windows 7 PC.


DVD ROM Drive required for installation.Microsoft Internet Explorer 6 or above.One GHz Intel Pentium III Processor or a equivalent AMD and Intel Processor.1.5 GB Hard Disk Space for Typical installation.CD,DVD, or a Blu-ray disc witha recordable or rewritable drive for burning.DirectX 9 or higher. 9 GB available Hard Disk Space for DVD images and some temporary files.Graphics card with a minimum of 32 MB of video memory.

Nero Disc Burning Software offers some interesting features like:
Provides fast and convenient user interface.Provides Enhanced codec support.Capable of creating high definition videos.Supports Auto-Backup of files.

Steps to install Nero 9 on your Windows 7 PC:

1. Run the installation wizard
2. Select I agree the Licence and agreement,
3. Click on Next,
4. Enter a serial number provided if the installation is done through the CD, check on the back side of the CD cover), then click on Next,
5. Follow on the procedure and at last click on Finish to complete the installation.

Get installed Nero 9 on your Windows 7 PC and avail advanced editing, copying and burning features.

Which version of Nero is compatible with Windows 7? From where can Nero 9 be downloaded ?

The latest version Nero 9 is supported by Windows 7 operating system. Its trial version can be downloaded from the following sites:

1) http://www.nero.com/enu/downloads-nero9-trial.php
2) http://www.softpedia.com/get/CD-DVD-Tools/Data-CD-DVD-Burning/Nero-9.shtml
The 32 bit and 64 bit Windows 7 RC products are available at: http://www.softpedia.com/get/CD-DVD-Tools/Data-CD-DVD-Burning/Nero-9.shtml

Following are some minimum system requirements that are needed before installing Nero 9 on Windows 7 PC.

DVD ROM Drive required for installation.Microsoft Internet Explorer 6 or above.One GHz Intel Pentium III Processor or a equivalent AMD and Intel Processor.1.5 GB Hard Disk Space for Typical installation.CD,DVD, or a Blu-ray disc witha recordable or rewritable drive for burning.DirectX 9 or higher. 9 GB available Hard Disk Space for DVD images and some temporary files.Graphics card with a minimum of 32 MB of video memory.

Enjoy faster burn, rip, share, edit and copy functions on your Windows 7 PCs with Nero.

Are Nero products compatible with Windows 7? What Nero products are compatible with Windows 7 ?

Yes, Nero products are compatible with Windows 7 operating system. Nero has worked closely with Microsoft for ensuring that the full range of Nero products is compatible with Windows 7.The products which are compatible on Windows 7 Operating system includes. Nero 9 integrated digital media and home entertainment suite.Nero liquidTV.Nero Move it.Nero Back Itup and Burn.

Configure MSN To Work With Outlook

Wednesday, June 2, 2010
Follow the steps to configure Configure MSN To Work With Microsoft Office Outlook 2007

Step 1.
In Windows XP, click Start, and then click Run. Copy and paste (or type) the following command in the Open box, and then press ENTER:
control panel
Control Panel appears.

In Windows Vista, click Start, and then copy and paste (or type) the following command in the Search box:
control panel
Control Panel appears.

Step 2. If you see the Pick a category view, click User Accounts.

If you do not see the Pick a category view, go to step 3.

Step 3. Double-click Mail.
Step 4. Click E-mail Accounts. The Account Settings window appears.
Step 5. On the E-mail tab, on the left side of the Account Settings window, click New.
Step 6. Click Microsoft Exchange, POP3, IMAP, or HTTP, and then click Next.
Step 7. Click to select the Manually configure server settings or additional server types check box, and then click Next.
Step 8. Click Internet E-mail, and then click Next.
Step 9. On the Add New E-mail Account screen, type the following setting information:
  • In the Your Name box, type your name as you want it to appear to recipients.
  • In the E-mail Address box, type your e-mail address. For example, type yourusername@msn.com.
  • In Account Type, select POP3.
  • In the Incoming Mail Server box, type pop3.email.msn.com.
  • In the Outgoing Mail Server (SMTP) box, type smtp.email.msn.com.
  • In the User Name box, type your MSN account name.
  • In the Password box, type your MSN password.
  • Select the Remember Password check box, if you want to save it.
  • Select the Require logon using Secure Password Authentication (SPA) check box.

Step 10.On the right side of the Add New E-Mail Account screen, click Test Account Settings. If you receive no errors, your e-mail account is set up correctly.

If you receive an error, make sure that you have entered all the information correctly, and then click Test Account Settings again. If all the information is correct and you continue to receive errors, go to the "Next steps" section for additional help.

Step 11.Click Next, and then click Finish.

source:http://support.microsoft.com/kb/287604

How To Disable Notification Balloon Tips in Vista ?

Tuesday, May 18, 2010
To disable the Notification Balloon tips, follow the instructions below:

Note: This method requires making a change to the Windows registry. I recommend manually creating a restore point prior to making any changes in case an editing error is made.

1. Go to Start

2. Select Run

3. With the run command window open, type in: regedit.exe

4. Press Enter on your keyboard or click OK

5. In the Windows registry, navigate to the following key:

HKEY_CURRENT_USER\Software\Microsoft\Windows\CurrentVersion\Explorer\Advanced

6. Single left click the "Advanced" registry entry to empty its contents in to the right pane.

7. Right click an empty area of the right pane and select New>> DWORD Value.

8. In the DWORD textbox, type in: EnableBalloonTips

9. Once this new REG_DWORD is created, double click it.

10. In the "Value data" textbox, enter the number 0.

11. Click OK

12. Exit the Windows Registry

You may have to reboot your system for this to take effect.

source:-http://www.5starsupport.com/vista-faq/customize-interface.htm#program-start

Houston Computer Support

Friday, April 2, 2010
Based at Houston and looking for authentic tech support. Go for iYogi’s technical support.

Computer support refers to provide assistance in resolving computer issues. You can easily resolve your computer issues with the help of a service provider. In case ,you are seeking for best computer support, then contact iYogi Technical Services. It will offer you computer support irrespective of your present location, whether you are at Houston or at any other part of the world.

Services offered by iYogi Technical Services

iYogi offers a variety of services to its customers. It offers services on all the versions of Microsoft operating system like Windows 7, Vista and various software. Technicians at iYogi will locate and remove all viruses and spywares from your system. They will also optimize your firewall to thwart future attacks.

You can select iYogi as your service provider because of many reasons; some of them are enlisted here:

• Remote PC repair through Internet
• Speedy online computer diagnostic and repair for one low price
• Instant access to Microsoft Certified technicians
• A faster, stronger, healthier PC without going anywhere

Dial iYogi’s toll free number to access 24/7 online computer repair services

Thursday, March 25, 2010
With the advancement in the technology each day, the ways of providing customer support have also changed. Now, the Internet has become the strongest medium of communication and iYogi has adopted this tool as its medium to render world class computer repair services to its clients based across the globe.

You can access iYogi’s computer repair services at any hour of the day as its tech experts work round the clock to provide you world class computer repair services. At iYogi, you get perfect assistance for:

• Installation and re-installation of software
• Troubleshooting
• Configuring settings for Internet, e-mail, Office suite
• Windows updates
• Virus removal
• Installation of antivirus, antispyware
• PC optimization
• Data recovery

How do they do it?

iYogi is no doubt a technical leader, which has always tried its level best in providing utmost satisfaction with its computer repair services. This is why it has adopted the latest yet most simple tool for executing its services i.e. the Internet. When you call iYogi, a tech expert lend patient ear to your problem, and then establish remote connection with your computer. From there onwards, the technician assisting you takes the full control over your computer and all you are asked to do is to just sit back and relax. Once the remote desktop connection is established with your due permission, the technician diagnoses the entire computer thoroughly to find out the root cause of the problem. Further, making use of the latest tools and software, the technician fixes your technical issues instantly.

The best part of iYogi’s computer services is its unlimited support plan. By making a payment of just $139.99, you can access computer repair services for an entire year. Isn’t that too economical? Adding on, iYogi has perfect resources to provide assistance in fixing laptop or desktop of any brand, including HP, Sony, Panasonic, Toshiba, Compaq, Gateway and many more.

Windows 7 in action: A smarter way to manage windows

Tuesday, September 29, 2009

Over the past few months, I’ve snapped hundreds of screenshots of the Windows 7 interface, for use in galleries here at ZDNet (like this one and this one) and in Windows 7 Inside Out. But static screenshots don’t do justice to some of the nuances of actually using a feature. So when ZDNet’s crack video production team offered to help me to produce some screencasts, I jumped at the chance.

You’ve no doubt heard about Aero Snap and Aero Shake. Here’s a chance to see these features in action. (Hint: Click the Full Screen button, in the lower right corner, just to the right of the Menu button, to see the most detail.)

I actually remember the first time I saw this feature demonstrated for me. I was immediately impressed with the idea that simple mouse gestures could make window management so much easier. That’s especially important these days, when 20- and 24-inch monitors are commonplace.

In fact, after using Windows 7 for nearly a full year, I have to confess that I’m spoiled by this feature more than any other. When I use a computer running another operating system—Windows Vista, XP, or even OS X—I really miss the ability to maximize and minimize a window with a flick of the mouse or to snap a window into position on the side of the screen.

This is the first of four Windows 7 demos that I’ve done in this series. Look for the next one next week at this time.